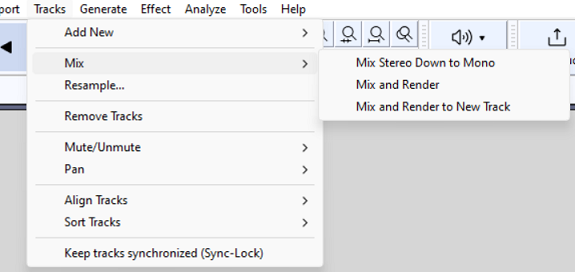
Tracks Menu: Mix
For more details Please see Mixing Audio Tracks.
Note carefully:
|
Mix Stereo Down to Mono
Converts the selected stereo track(s) into the same number of mono tracks, combining left and right channels equally by averaging the volume of both channels. The tracks will be rendered with any amplitude envelope or Gain/Volume and Pan settings applied.
An important reason to convert stereo to mono is that it produces higher quality for the same bit rate (and hence file size) in lossy, compressed audio files like MP3 or AAC. Stereo Track to Mono is not available with stereo tracks split into left and right channels, or where the start or end positions of the channels are different.
If you have a split stereo track, you can use the Track Dropdown Menu to join the channels into a single stereo track before converting to mono. This menu also lets you convert a stereo track to a mono track containing only one of the channels:
|
Mix and Render
Mix and Render mixes down all selected tracks (including any which may be muted) to a single mono or stereo track, rendering to the waveform all real-time transformations that had been applied (such as track gain, panning, amplitude envelopes or a change in Project Sample Rate).
The resulting track (called "Mix") replaces the selected tracks and is placed where the last selected track was.
Like all tracks, the "Mix" track can be renamed using the Audio Track Dropdown Menu.
| If you try to mix two very loud tracks together, you may get clipping (it will sound like pops, clicks and noise). To avoid this, use the track gain controls to reduce the amplitude of all of your tracks before mixdown. |
See Mixing Audio Tracks for more details.
Mix and Render to New Track Ctrl + Shift + M Extra
This command performs the same actions as Mix and Render above, except that the original tracks are preserved rather than being replaced by the "Mix" track. The selected tracks (including any muted tracks that are selected) will be rendered with any amplitude envelope or gain and pan settings applied.
The resulting track (called "Mix") is placed below the last selected track.
Rendering a single track
If you use Mix and Render or Mix and Render to New Track on a single track (this is basically just Rendering as there is nothing to "Mix") the track will retain its original name:
- The tracks will be rendered with any amplitude envelope or gain and pan settings applied.
- For Mix and Render: the track remains in its original position, its selectedness and its previously set track properties such as size, display type and waveform colorway.
- For Mix and Render to New Track: the new track is placed underneath the original track (which will retain its selection and properties).
