Silence Finder
Silence Finder - Setting Parameters has more help on adjusting the Silence Finder slider settings.
After typing the name of the track or section in each label, and selecting Multiple Files will export audio files in one process corresponding to each label's audio. See Splitting a recording into separate tracks.
If you already have a label track and that is included in the selection that you make for the analysis then these labels will be added to your selected label track - possibly causing confusion with your existing labels.
|
- Accessed by:
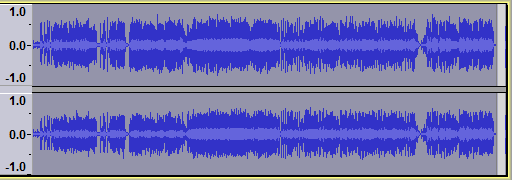
Silence Finder divides up a selection by placing point labels inside areas of silence.
Use this if you just want to split the recording into tracks at a specific point without removing the silences between them.
If labels are produced in the middle of album tracks, increase the silence level and duration. If some album tracks do not have a label between them, reduce the silence level and duration. See Setting Parameters for more help choosing values to place the labels correctly.
| If the selection ends with silence, the final label is not placed according to the "Label placement (seconds before silence ends)" setting but is placed after the start of the final silence according to the "Minimum duration of silence (seconds)" setting. |
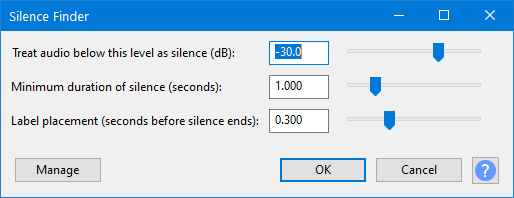
Treat audio below this level as silence (dB)
Sets the threshold level below which the audio is considered to be "silent".
If this threshold level is set too low, then the effect will not detect any silences. If the threshold is set too high, then the effect will treat quiet sounds as if they are silences.
Minimum duration of silence (seconds)
Very small gaps in the audio are ignored. This is important because the level of normal audio frequently drops to very low levels momentarily. This setting tells the effect to ignore periods of "silence" (low level audio) that are shorter duration than the specified size (measured in seconds). This should be set a little smaller than the minimum duration silence that you wish to mark.
Example: If the gaps that you want to label are around 1.0 seconds duration, set this to 0.8 seconds. Silences shorter than 0.8 seconds will then be ignored, and silences longer than 0.8 seconds will be labelled.
Label placement (seconds before silence ends)
When set greater than 0 seconds, each label is offset from the end of the detected silence by the specified amount.
Example: If a track starts with silence and the first sound above the threshold level occurs at time=5.0 seconds, then the end of the silence is at time=5.0 seconds. If the "Label Placement" is set to 0.5 seconds, then the label for this audio gap will be placed at time=4.5 seconds (0.5 seconds before the end of the silence).
Buttons
Clicking on the command buttons give the following results:
- gives a dropdown menu enabling you to manage presets for the tool and to see some detail about the tool. For details see Manage presets
- applies the effect to the selected audio with the current effect settings and closes the dialog
- aborts the effect and leaves the audio unchanged, closing the dialog
Example
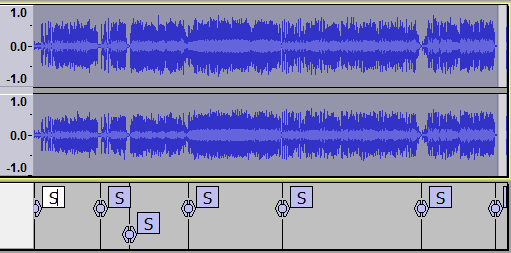
Here is a stereo track with six songs. The entire project is selected prior to using the Analyze functions.
placing an "S" label just before the beginning of each song plus a seventh label at the end (as the
final track ends in silence).